SushiBot
INTRODUCTION:
This assignment was to make a bot that played the game Sushi Go Round. The objective was to
follow the tutorial found here.
I will go through the steps that i did to build the bot from the tutorial.
Testing will be in blue. Errors and problems that i encountered will be in red. Explanations are in black.
Below is the full demonstration of the finished bot.
PROBLEM DISCUSSION:
Step 1. Creating new Python Project
I created a python project and i opened it in PyCharm.

STEP 2. Downloading Libraries
The first thing i did was download python 3 from Anaconda, Inc. I then downloaded the PyCharm
Community Edition and set my paths correctly.
*Problem* The tutorial required that i download and install additional python libraries. However, i was
not able to download them directly from the links provided, because some of the libraries were used for
an older version of python. I attempted to look for alternatives and download them. I wrote the screenGrab()
function in order to test if it worked.
*Testing* if the libraries installation worked. It did not recognize ImageGrab, so it was unsuccessful.

Therefore, i decided to then install the libraries through PyCharm. Below is what a screenshot of the installed
libraries.
*Testing* the libraries downloaded from PyCharm. The installation worked, as you can see, the ImageGrab import is
no longer underlined red.

Step 3: Getting the First Screen Grab
The first function that i created from the tutorial was screenGrab(). This function grabs a full screen picture of the
screen, and then stores it
as a PNG file.
The next function is the main() function.
*Testing* the screenGrab() function. It took this image, therefore it is successful.

STEP 4. Creating the Game Box
Instead of grabbing an image of the whole screen, i needed to grab coordinates specific to the game area.
This reduces the need for extra processing power.
I took a screenshot of the whole screen, and then I used the program Paint.net to look for
coordinates of the gaming area.
The coordinates were: (340, 116, 1140, 716).
To add flexibility, i had to create 2 new variables, x_pad and y_pad, that stored the game area relative
to the screen. This makes it easier set the bot up to use on different browsers.
*Testing* the screenGrab() function with the game area. Successful. The screenshot and code are below.


Step 5. Creating a Docstring
To inform the user of the bot about where the screen and game area need to be in order to run the bot successfully, i added the Docstring at the top that describes the required position. The Docstring is below. I also included a screenshot of the game area below it.


STEP 6. Changing quickGrab.py and Adding a New File
I created a separate file name code.py that will contain the rest of the code that we will write.
Since we want quickGrab.py to be a quick screenshot tool, we change the extension from .py to .pyw. This runs the script but does not launch the console.


STEP 7. Basic Mouse Clicking
I imported win32api and win32con. win32api wraps low-level C code and makes it usable in this program.
I then created a function that has the first mouse click. This is a normal left click with a press, hold for .1 seconds, and release.
The next 2 functions are the process of holding down the mouse for a period of time. The leftDown() function makes the click, while the leftUp() function releases it.

STEP 8. Basic Mouse Movement
I added two more functions. mousePos(cord) sets the mouse to the coordinates passed to it by an x,y tuple.
get_cords() will be be used to print the current location of the mouse to the console as an x,y tuple as well.

STEP 9. Navigating Game Menus
I used get_cords() to get the position of the play, continue, skip, and continue menu buttons.
*Testing* The video below shows when i ran the get_cords() function. It worked successfully, and it returned the locations of the menu.
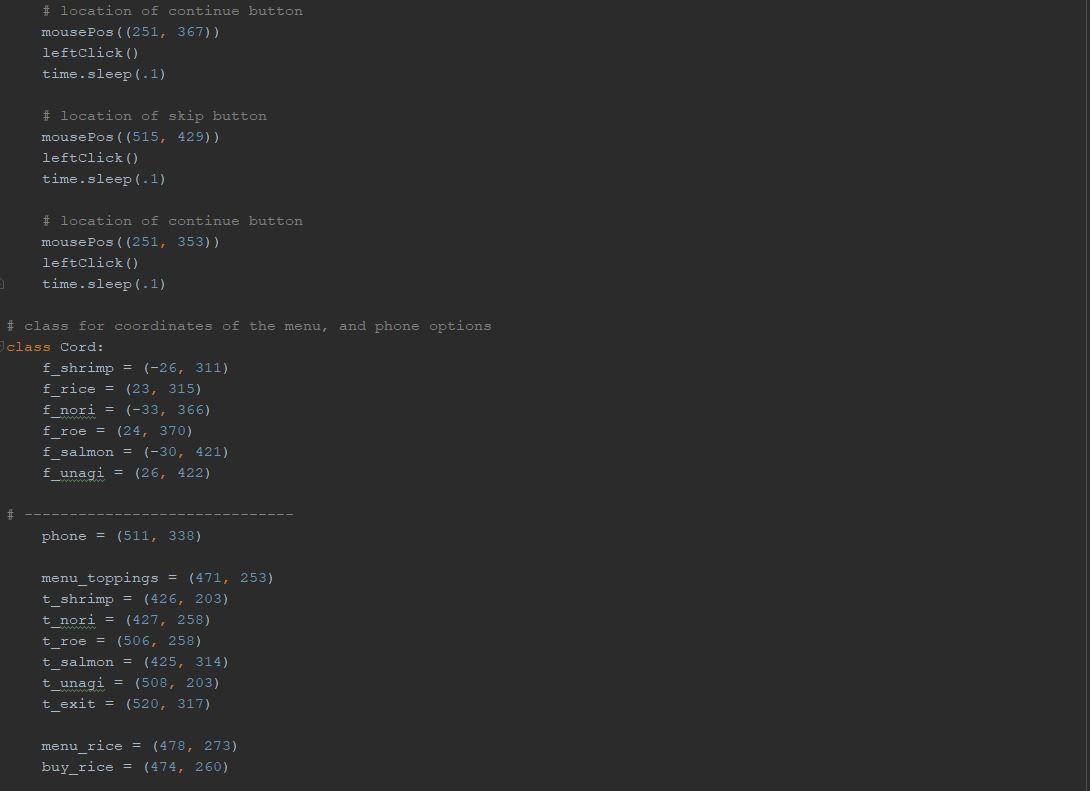
I then created the startGame() function, which, with the cords i mined above, positions the mouse at the coordinates of each of the start menus, and then clicks, and then tells it to wait .1 second, so that the other menu can appear. (I ran get_cords() again to get better positioning on the menu buttons)

*Problem* (This happened earlier in the process, but this was the best place to put the explantation)I initially used Microsoft Edge as the browser where my game was located because the game was not loading on my Google Chrome browser. I went through the padding, as well as well as the get_cords() function. However, when i tested the startGame() function, the buttons would not click. Below is the video of startGame() running in Microsoft Edge.
(This happened earlier in the process, but this was the best place to put the explanation)
*Test* I then retried opening the game in Google Chrome, and the game. I went through the padding and finding the coordinates (The coordinates for this try are the exact ones mentioned in steps 4,5,7,8). I then ran the startGame() function, and it was successful. The video below demonstrates what i did. (Video includes audio with more explanation)
STEP 10. Food Coordinates
To get the coordinates of all the food buttons on the bottom left side of the game, i used the get_cords() function again just like for the menus. I hovered over the location, and when i pressed enter, the get_cords() function returned the location coordinates. Below are the coordinates that were returned for each button.

STEP 11. Empty Plate Coordinates

STEP 12. Getting Food Coordinates

STEP 13. Clearing Tables

*Test* I tested the clear_tables() function in the video below. It was successful. (Video contains audio)
STEP 14. Making the Sushi


*Test* Below i test the makeFood() function. The code works, when i enter the specific food names, the program correctly makes the requested food. (Video contains audio)
STEP 15. FoldMat() Function
After creating the sushi, the mat where it is made needs to be clicked in order for the sushi to be rolled out and sent out to the customer. The mat is simpler because all that needs to happen is to move over a few pixels from the button menu at the bottom left of the game. The following image shows the code.

*Problem* The code suggested on the tutorial only added 40 pixels to the x axis, but it didn't work on mine, so i added 10 more pixels for a total of 50, and it worked.
*Test* Below i tested the foldMat() function. (Video contains audio)
STEP 16. Importing Numpy and ImageOps
I imported the ImageOps module that is used to do operations on images.
The statement "for numpy import * " allows me to inherit the module's scope, and therefore I could call str() instead of numpy.str().
*Test* Below is a screenshot of the import statements, there was no error white importing them.

STEP 17. Making the Computer See
The first part of this step is to change the screenGrab() function. I commented out the statement that saves the image we take.
The other change is that we now return the image object so that we can use it outside of the screenGrab() function.
Below is the updated screenGrab() function with these changes.

I will now get the RGB values of the greyed out menu that our buyFood() function will check against.
The first step was to play the game and click on the phone menu. The next step is to run the code and input: >>>im = screenGrab() and enter. This statement assigns the screenshot taken to the instance im. We can then call the getpixel(xy) method to get pixel data.
Next i get the RGB values for each food item that is greyed out. This will then bet the expected value that the bot tests against when figuring out whether food is available or not.
I will use the phone coordinates that I got in STEP 12.
Below is a video of the process of getting the RGB values from the phone cords. (w/ audio)
Also below is a screenshot of the results of running these statements.

STEP 18. Creating buyFood() Function
The next step is to create the buyFood() function that orders food when low.
This buyFood() function takes in a parameter. I am passing the food name. The if statements that follow catch the parameter if it matches and give the required response.
If i pass the parameter 'rice', the mouse position goes and clicks the phone, clicks on the rice menu, and then takes an image of the screen and calls the getpixel(Cord.buy_rice) method and tests it against the RGB value for the greyed out item. If it is true, it means that the item is available to purchase and it follows the instructions to purchase. If it is false, we can not buy it, the menu is told to close, and then try again later.
The process is the same for nori and roe.
Below are screenshots of my buyFood(food) function.


STEP 19. Keeping Track of Ingredients
The next step is to create a dictionary that stores the amount of ingredients available at all times. The game begins with a set amount of food on hand at the beginning, so those will be the beginning numbers.
Below is a screenshot of the dictionary in the code.

STEP 20. Adding Tracking to Code
The dictionary of foodOnHand will now be added into the makeFood() function. Every time there is food made, the appropriate ingredients will be subtracted. Every time food is bought, the food will be added in as well.
The video below shows where in the code the counter was added.
STEP 21. Checking Food on Hand
Since both of the makeFood() and buyFood() functions have the counter set up, the next step is to create a function that checks the changes and checks whether we are low on an ingredient. The checkFood() function has a for loop that iterates through the foodOnHand dictionary. It checks for the name of the ingredient, and if it matches, it checks if it is below the threshold, and if it is, it calls buyFood() with the correct parameter to order more.
Below is a screenshot of the checkFood() function.
*Test* Below is also a video of checkFood() working properly. (video test some of the previous functions first, but checkFood() is tested near the end of the video)

STEP 22. Traversing RGB Values - Setup
Instead of manually searching for an area in each thought bubble that has a unique RGB value, we can use image summing and averaging. It takes a list of RGB values instead of looking at one pixel. As i take a screenshot, the image is grayscaled, put into an array, and then summed. The sum will be used to test and compare multiple images.
The first step in achieving this is to create a new function called grab(). This new function takes a screen grab, and then grayscales and assigns it to the instance im. Then an array is created using the getcolors() method from the PIL library and assigns them to the variable a. I then sum the values of the array and print them. These sums will be used when comparing images.
Below is grab() function.

STEP 23. Setting New Bounding Boxes
The screen grab below is the one i used to get the coordinates to set up the bounding boxes inside the bubbles that identify the wanted sushi type. The code in the following videos creates 6 functions called get_seat_(1,2,3,4,5,6). These functions create a bounding box for each bubble, and it converts to RGB values array, and prints the sum to the screen.
The get_all_seats() function just calls all the seats.

*Error* I tried the method of mining coordinates that the tutorial showed. I tried doing the large box that they suggested. I tried getting the coordinates from just the screenshot that included the game area, however, the image that it returned was wrong, because the coordinates related to the whole screen.
*Test* Below is a video of the first image that was taken. It was wrong, because it took an image of a piece of my bookmarks tab from my browser.
I then adjusted the coordinates to reflect the whole screen, and it was successful.
*Test* Below is a video that shows the image that was returned with the fixed coordinates.
*Error* The tutorial said to run the code multiple times to make sure that each sushi type displays the same sum each time so that the bot distinguishes correctly. However, the results were always different regardless of the sushi type. I then closely looked at all the bubbles in the screenshot above and realized that there were some different pixels in even the same sushi type. This meant that the bounding box needed to be smaller, and it had to be large enough, and at the location such that the values were always correct for the given sushi types.
Therefore, I tried different bounding boxes to check which box constantly returned the correct numbers.
Below is a screenshot of one of the seats after i resized the bounding box. The box is smaller, but it keeps the values constant for each sushi type.

*Test* The video below shows the sum results after i made the changes in the above screenshot. It successfully gets the same values for each sushi type.
STEP 24. Creating a Sushi Types Dictionary
Now that I know that each sushi type has the right value, I created dictionary that holds the correct sums.
Below is the dictionary created.

STEP 25. Creating a No Bubble Class
Since there are times where there are no bubbles, I need to get sums for these occurrences. To do this, i ran the get_all_seats() function when no customers were present.
The screen grab below shows the results of the call.

STEP 26. Putting It Together
The second to last step is to create a function, check_bubs(), that allows the bot to respond to customers, make their orders, and buy ingredients.
The process the bot follows is to check the seats, if there is a customer, make the order, check food, if low, purchase, clear tables, and then repeat the process all over again.
(The following explanation is for the first seat, but all other seats work the same way with their own values)The first thing the bot does in this function is check if there is enough food. Then it takes a screenshot of the first bubble, and assigns the sum to s1. It then check whether or not that value equals the value of the empty seat. If it does not equal, it means that there is a customer. The bot then checks the sushiTypes dictionaries to see if one of them equals the sum in s1. If it does, we call makeFood() and pass the appropriate sushi type as the argument. The function clear_tables is called every two seats to make sure there are always available seats.


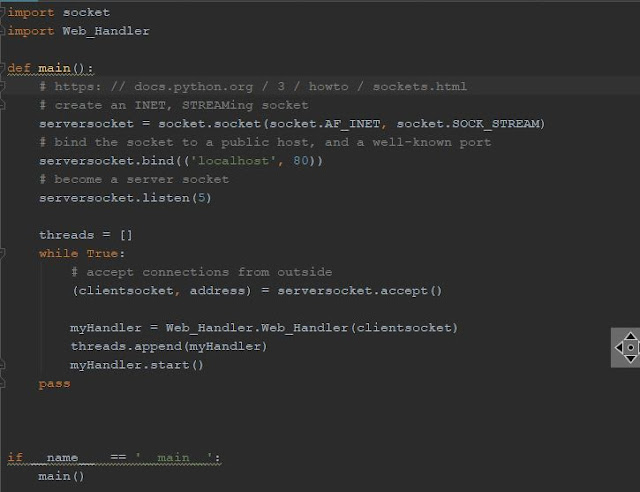
STEP 27. Main Loop
The final step is to create the main() function, a loop that plays the game. There is no break mechanism, which means that execution is stopped manually. Below is the final main() function.

STEP 28. Full Final Test
Testing the completed bot. Everything worked fine.
Final Comments: The bot worked fine often, but it then got stuck in the phone menus other times or after it had been going for a few purchases.
Extra: Below is my full source code for this project


This assignment was to make a bot that played the game Sushi Go Round. The objective was to
follow the tutorial found here.
I will go through the steps that i did to build the bot from the tutorial.
Testing will be in blue. Errors and problems that i encountered will be in red. Explanations are in black.
Below is the full demonstration of the finished bot.
PROBLEM DISCUSSION:
Step 1. Creating new Python Project
I created a python project and i opened it in PyCharm.
STEP 2. Downloading Libraries
The first thing i did was download python 3 from Anaconda, Inc. I then downloaded the PyCharm
Community Edition and set my paths correctly.
*Problem* The tutorial required that i download and install additional python libraries. However, i was
not able to download them directly from the links provided, because some of the libraries were used for
an older version of python. I attempted to look for alternatives and download them. I wrote the screenGrab()
function in order to test if it worked.
*Testing* if the libraries installation worked. It did not recognize ImageGrab, so it was unsuccessful.
Therefore, i decided to then install the libraries through PyCharm. Below is what a screenshot of the installed
libraries.
*Testing* the libraries downloaded from PyCharm. The installation worked, as you can see, the ImageGrab import is
no longer underlined red.
Step 3: Getting the First Screen Grab
The first function that i created from the tutorial was screenGrab(). This function grabs a full screen picture of the
screen, and then stores it
as a PNG file.
The next function is the main() function.
*Testing* the screenGrab() function. It took this image, therefore it is successful.
STEP 4. Creating the Game Box
Instead of grabbing an image of the whole screen, i needed to grab coordinates specific to the game area.
This reduces the need for extra processing power.
I took a screenshot of the whole screen, and then I used the program Paint.net to look for
coordinates of the gaming area.
The coordinates were: (340, 116, 1140, 716).
To add flexibility, i had to create 2 new variables, x_pad and y_pad, that stored the game area relative
to the screen. This makes it easier set the bot up to use on different browsers.
*Testing* the screenGrab() function with the game area. Successful. The screenshot and code are below.
Step 5. Creating a Docstring
To inform the user of the bot about where the screen and game area need to be in order to run the bot successfully, i added the Docstring at the top that describes the required position. The Docstring is below. I also included a screenshot of the game area below it.
STEP 6. Changing quickGrab.py and Adding a New File
I created a separate file name code.py that will contain the rest of the code that we will write.
Since we want quickGrab.py to be a quick screenshot tool, we change the extension from .py to .pyw. This runs the script but does not launch the console.
I imported win32api and win32con. win32api wraps low-level C code and makes it usable in this program.
I then created a function that has the first mouse click. This is a normal left click with a press, hold for .1 seconds, and release.
The next 2 functions are the process of holding down the mouse for a period of time. The leftDown() function makes the click, while the leftUp() function releases it.
STEP 8. Basic Mouse Movement
I added two more functions. mousePos(cord) sets the mouse to the coordinates passed to it by an x,y tuple.
get_cords() will be be used to print the current location of the mouse to the console as an x,y tuple as well.
STEP 9. Navigating Game Menus
I used get_cords() to get the position of the play, continue, skip, and continue menu buttons.
*Testing* The video below shows when i ran the get_cords() function. It worked successfully, and it returned the locations of the menu.
I then created the startGame() function, which, with the cords i mined above, positions the mouse at the coordinates of each of the start menus, and then clicks, and then tells it to wait .1 second, so that the other menu can appear. (I ran get_cords() again to get better positioning on the menu buttons)
*Problem* (This happened earlier in the process, but this was the best place to put the explantation)I initially used Microsoft Edge as the browser where my game was located because the game was not loading on my Google Chrome browser. I went through the padding, as well as well as the get_cords() function. However, when i tested the startGame() function, the buttons would not click. Below is the video of startGame() running in Microsoft Edge.
(This happened earlier in the process, but this was the best place to put the explanation)
*Test* I then retried opening the game in Google Chrome, and the game. I went through the padding and finding the coordinates (The coordinates for this try are the exact ones mentioned in steps 4,5,7,8). I then ran the startGame() function, and it was successful. The video below demonstrates what i did. (Video includes audio with more explanation)
STEP 10. Food Coordinates
To get the coordinates of all the food buttons on the bottom left side of the game, i used the get_cords() function again just like for the menus. I hovered over the location, and when i pressed enter, the get_cords() function returned the location coordinates. Below are the coordinates that were returned for each button.
STEP 11. Empty Plate Coordinates
To get the coordinates of the empty plates, i
played the game until all the plate sections were empty. Then, i ran the
get_cords() function to get the coordinates for each of the six plate
locations. The plate locations are shown below.
STEP 12. Getting Food Coordinates
To get the coordinates for ordering, i played
the game. I ran the get_cords() function at every location that i needed
coordinates, and it returned them. I did it for the phone, the initial
"stock order" menu, the "toppings" menu, the
"rice" menu, and the "shipping" menu. Below are the
coordinates that i got after doing this process.
STEP 13. Clearing Tables
To clear the tables 1-6, i created a function
called clear_tables() . I used the coordinates that I grabbed in step 11, and I
set it so that the mouse position goes to each plate and does a left click to
pick it up. Below is the code.
*Test* I tested the clear_tables() function in the video below. It was successful. (Video contains audio)
STEP 14. Making the Sushi
In the following function, makeFood(food), the
function accepts an argument for the name of the sushi, and then makes it with
the proper ingredients based on the value passed. The following images include
the code that I wrote.
*Test* Below i test the makeFood() function. The code works, when i enter the specific food names, the program correctly makes the requested food. (Video contains audio)
STEP 15. FoldMat() Function
After creating the sushi, the mat where it is made needs to be clicked in order for the sushi to be rolled out and sent out to the customer. The mat is simpler because all that needs to happen is to move over a few pixels from the button menu at the bottom left of the game. The following image shows the code.
*Problem* The code suggested on the tutorial only added 40 pixels to the x axis, but it didn't work on mine, so i added 10 more pixels for a total of 50, and it worked.
*Test* Below i tested the foldMat() function. (Video contains audio)
STEP 16. Importing Numpy and ImageOps
I imported the ImageOps module that is used to do operations on images.
The statement "for numpy import * " allows me to inherit the module's scope, and therefore I could call str() instead of numpy.str().
*Test* Below is a screenshot of the import statements, there was no error white importing them.
STEP 17. Making the Computer See
The first part of this step is to change the screenGrab() function. I commented out the statement that saves the image we take.
The other change is that we now return the image object so that we can use it outside of the screenGrab() function.
Below is the updated screenGrab() function with these changes.
I will now get the RGB values of the greyed out menu that our buyFood() function will check against.
The first step was to play the game and click on the phone menu. The next step is to run the code and input: >>>im = screenGrab() and enter. This statement assigns the screenshot taken to the instance im. We can then call the getpixel(xy) method to get pixel data.
Next i get the RGB values for each food item that is greyed out. This will then bet the expected value that the bot tests against when figuring out whether food is available or not.
I will use the phone coordinates that I got in STEP 12.
Below is a video of the process of getting the RGB values from the phone cords. (w/ audio)
Also below is a screenshot of the results of running these statements.
STEP 18. Creating buyFood() Function
The next step is to create the buyFood() function that orders food when low.
This buyFood() function takes in a parameter. I am passing the food name. The if statements that follow catch the parameter if it matches and give the required response.
If i pass the parameter 'rice', the mouse position goes and clicks the phone, clicks on the rice menu, and then takes an image of the screen and calls the getpixel(Cord.buy_rice) method and tests it against the RGB value for the greyed out item. If it is true, it means that the item is available to purchase and it follows the instructions to purchase. If it is false, we can not buy it, the menu is told to close, and then try again later.
The process is the same for nori and roe.
Below are screenshots of my buyFood(food) function.
STEP 19. Keeping Track of Ingredients
The next step is to create a dictionary that stores the amount of ingredients available at all times. The game begins with a set amount of food on hand at the beginning, so those will be the beginning numbers.
Below is a screenshot of the dictionary in the code.
STEP 20. Adding Tracking to Code
The dictionary of foodOnHand will now be added into the makeFood() function. Every time there is food made, the appropriate ingredients will be subtracted. Every time food is bought, the food will be added in as well.
The video below shows where in the code the counter was added.
STEP 21. Checking Food on Hand
Since both of the makeFood() and buyFood() functions have the counter set up, the next step is to create a function that checks the changes and checks whether we are low on an ingredient. The checkFood() function has a for loop that iterates through the foodOnHand dictionary. It checks for the name of the ingredient, and if it matches, it checks if it is below the threshold, and if it is, it calls buyFood() with the correct parameter to order more.
Below is a screenshot of the checkFood() function.
*Test* Below is also a video of checkFood() working properly. (video test some of the previous functions first, but checkFood() is tested near the end of the video)
STEP 22. Traversing RGB Values - Setup
Instead of manually searching for an area in each thought bubble that has a unique RGB value, we can use image summing and averaging. It takes a list of RGB values instead of looking at one pixel. As i take a screenshot, the image is grayscaled, put into an array, and then summed. The sum will be used to test and compare multiple images.
The first step in achieving this is to create a new function called grab(). This new function takes a screen grab, and then grayscales and assigns it to the instance im. Then an array is created using the getcolors() method from the PIL library and assigns them to the variable a. I then sum the values of the array and print them. These sums will be used when comparing images.
Below is grab() function.
STEP 23. Setting New Bounding Boxes
The screen grab below is the one i used to get the coordinates to set up the bounding boxes inside the bubbles that identify the wanted sushi type. The code in the following videos creates 6 functions called get_seat_(1,2,3,4,5,6). These functions create a bounding box for each bubble, and it converts to RGB values array, and prints the sum to the screen.
The get_all_seats() function just calls all the seats.
*Error* I tried the method of mining coordinates that the tutorial showed. I tried doing the large box that they suggested. I tried getting the coordinates from just the screenshot that included the game area, however, the image that it returned was wrong, because the coordinates related to the whole screen.
*Test* Below is a video of the first image that was taken. It was wrong, because it took an image of a piece of my bookmarks tab from my browser.
I then adjusted the coordinates to reflect the whole screen, and it was successful.
*Test* Below is a video that shows the image that was returned with the fixed coordinates.
*Error* The tutorial said to run the code multiple times to make sure that each sushi type displays the same sum each time so that the bot distinguishes correctly. However, the results were always different regardless of the sushi type. I then closely looked at all the bubbles in the screenshot above and realized that there were some different pixels in even the same sushi type. This meant that the bounding box needed to be smaller, and it had to be large enough, and at the location such that the values were always correct for the given sushi types.
Therefore, I tried different bounding boxes to check which box constantly returned the correct numbers.
Below is a screenshot of one of the seats after i resized the bounding box. The box is smaller, but it keeps the values constant for each sushi type.
*Test* The video below shows the sum results after i made the changes in the above screenshot. It successfully gets the same values for each sushi type.
STEP 24. Creating a Sushi Types Dictionary
Now that I know that each sushi type has the right value, I created dictionary that holds the correct sums.
Below is the dictionary created.
STEP 25. Creating a No Bubble Class
Since there are times where there are no bubbles, I need to get sums for these occurrences. To do this, i ran the get_all_seats() function when no customers were present.
The screen grab below shows the results of the call.
STEP 26. Putting It Together
The second to last step is to create a function, check_bubs(), that allows the bot to respond to customers, make their orders, and buy ingredients.
The process the bot follows is to check the seats, if there is a customer, make the order, check food, if low, purchase, clear tables, and then repeat the process all over again.
(The following explanation is for the first seat, but all other seats work the same way with their own values)The first thing the bot does in this function is check if there is enough food. Then it takes a screenshot of the first bubble, and assigns the sum to s1. It then check whether or not that value equals the value of the empty seat. If it does not equal, it means that there is a customer. The bot then checks the sushiTypes dictionaries to see if one of them equals the sum in s1. If it does, we call makeFood() and pass the appropriate sushi type as the argument. The function clear_tables is called every two seats to make sure there are always available seats.
STEP 27. Main Loop
The final step is to create the main() function, a loop that plays the game. There is no break mechanism, which means that execution is stopped manually. Below is the final main() function.
STEP 28. Full Final Test
Testing the completed bot. Everything worked fine.
Final Comments: The bot worked fine often, but it then got stuck in the phone menus other times or after it had been going for a few purchases.
Extra: Below is my full source code for this project

Comments
Post a Comment